Danger on the Dark-Squares
As an aspiring young player, I heard much about "light-squares" and "dark-squares" but I'm sure that I did not understand. So lets take a BLOG-day and look at an important theme.
Most players are aware of the simple mate with a white pawn on f6 and a white Qh6-g7#. Change the f6-pawn to a Bf6 and the result is the same. Place the same checkmate within a black pawn structure with pawns on f6,g7, and h6 and you can immediately see that white has dominated the dark-squares on the black kingside. Here are two dozen games that involve this theme. All involve a Q(x)h6 sacrifice that succeeds in most (but not all) of the games. I hope that you play through at least the following two games if not all of the games in this small collection. You may find that your chess improves as a result. You'll certainly begin to see the connection between some fun chess concepts, dominating the center with e4-e5, forcing black to weaken te kingside with g7-g6, and taking advantage of the dark-square weaknesses that result.
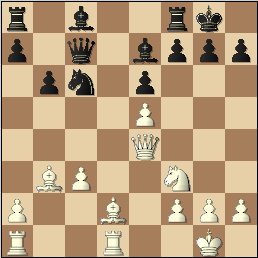
1.e4 c5 2.d4 cxd4 3.c3 Nf6 4.e5 The pawn on e5 is key to what follows. By forcing the Nf6 from its defense of the kingside, white gains space and the opportunity to force further kingside weaknesses. 4...Nd5 5.Nf3 e6 6.Bc4 Nb6 7.Bb3 d6 8.cxd4 To make sure that a white pawn remains on e5 8...Nc6 9.Qe2 overprotecting e5 9...dxe5 10.dxe5 It is becoming clear that black has a bad light-squared bishop and that white has an obvious space advantage in the center 10...Bb4+ 11.Nc3 Nd5 12.Bd2 Nxc3 13.bxc3 Be7 14.0-0 0-0 Sure seems safe to 0-0 kingside, right? 15.Rfd1 Threatening discovered attacks down the d-file 15...Qc7 16.Qe4 b6 Diagram
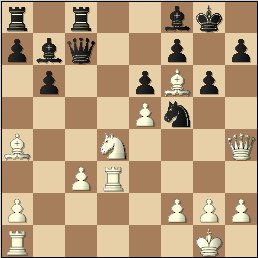
1.e4 c5 2.Nf3 e6 3.d4 cxd4 4.Nxd4 Nf6 5.Nc3 Bb4 6.e5 Same theme. Establish the pawn on e5 6...Nd5 7.Bd2 Nxc3 8.bxc3 Ba5 9.Qg4 Weaken the kingside 9...0-0 10.Bd3 Qc7 11.0-0 Nc6 12.Nxc6 dxc6 13.Qe4 Force the advance of a kingside pawn 13...g6 14.Rad1 Qe7 15.Bh6 dominate the subsequent dark-square weaknesses 15...Re8 16.Qf4 Bxc3 17.Bg5 Qb4 18.Be4 Avoid exchanges 18...Qa5 19.Bf6 Bb4 Diagram
Books on tactics
 Morphy's Games of Chess, Philip Sergeant. A wonderful book for a student interested in playing through these magnificant games.