Lolli's mate
The best way to learn tactics? I believe that pattern matching has much to do with it. That's a fancy way of saying that experience with many different tactical situations will help you to recognize tactical themes when they arise in your games.
In Anand's win against Timman at Wijk aan Zee (2004), he used a beautiful Rxh7 sacrifice. In that position, the rook sacrifice was against a Black king on g8 and with a white pawn on g7.
As it turns out, it's far more common to see the sacrifice with the black king on g7 (perhaps after a Bxg7 exchange). To make it work, white usually needs to be able to follow up with Qxf7+ and then Rh1 soon thereafter. Here's the main mating pattern:
Rxh7 sacrifice
[Edwards,Jon]
I offer 30 examples of this theme, about half of which I have briefly annotated, and here are two of my favorites:
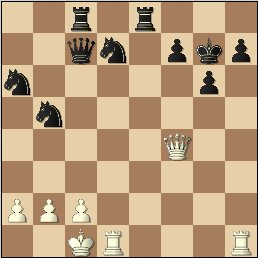
1.e4 Nf6 2.e5 Nd5 3.Nc3 Nxc3 4.dxc3 g6 5.Nf3 Bg7 6.Bf4 d6 7.Qd2 Nc6 8.0-0-0 Bg4 9.exd6 cxd6 10.Be2 Qa5 11.a3 0-0 12.Bh6 Qb6 13.h4 Bxf3 14.gxf3 Rfc8 15.Bxg7 Kxg7 16.h5 Qxf2 17.hxg6 hxg6 Diagram
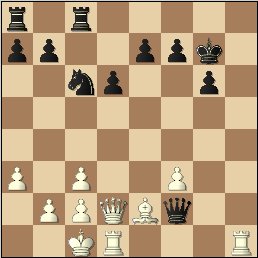
1.d4 f5 2.c4 g6 3.Nf3 Nf6 4.Nc3 Bg7 5.g3 0-0 6.Bg2 d6 7.0-0 c6 8.Qc2 Kh8 9.b3 Na6 10.Bb2 Nh5 11.Rfd1 f4 12.d5 Bf5 13.Qd2 c5 14.Nh4 Bd7 15.Ne4 Qc8 16.Bxg7+ Kxg7 17.Ng5 Nc7 18.Qd3 Qe8 19.Bf3 Nf6 20.gxf4 Bg4 21.Bxg4 Nxg4 22.e3 Nh6 23.Kh1 Nf5 24.Nxf5+ Rxf5 25.Rg1 Qf8 26.Rg3 Qf6 27.Rag1 Rf8 28.Rh3 Rh8 29.Ne4 Qb2 Diagram
Books on tactics
 Morphy's Games of Chess, Philip Sergeant. A wonderful book for a student interested in playing through these magnificant games.